Lesson 12: Ready for Liftoff?
In this final lesson, we'll talk about how preparing the satellite, the groundstation, and the team for the launch. After this lesson, we'll also have a review to check the flight readiness, but this lesson focuses on maximizing the chances of a successful mission. In this lesson, we'll talk about preparing your electronics mechanically and electrically, checking radio communication system, and finally discussing some useful preparation steps to be done well before the actual launch event.
This lesson is again a bit different, as instead of looking at new programming concepts, we are discussing how to improve reliability of the device in the missino. Furthermore, while you probably aren't done building (or defining) the satellite mission if you are now first going through the course, it is good to read through the materials on this page, consider these aspects when planning your device and mission, and get back to them when actually preparing for the launch.
Mechanical considerations
Firstly, like discussed in the previous lesson, the electronics stack should be built so that it stays together even in heavy vibration and shock. A good way to design the electronics is to use perf boards, which are held together by standoffs and connected electrically through either connector, or with a well supported cable. Finally, the entire electronics stack should be attached to the satellite frame such that it doesn't move around. A rigid connection with screws is always a solid choice (pun intended), but that's not the only option. One alternative could be designing the system to break on impact, similar to a crumple zone. Alternatively, a cushioned mounting system with rubber, foam or similar system could reduce stresses experienced by the electronics, aiding in creating multi-use systems.
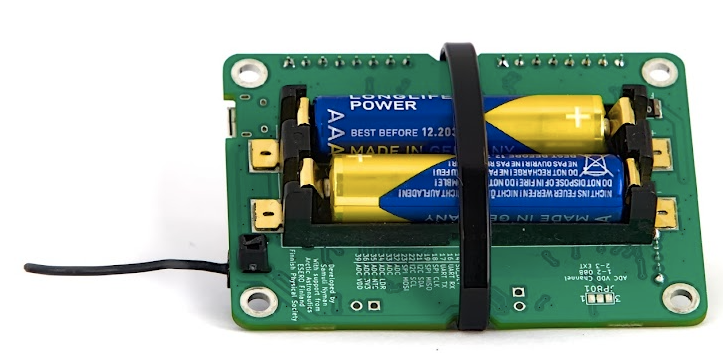
In a typical CanSat, there are some items that are particularly vulnerable to problems during launch or faster-than-expected landings. These are the batteries, the SD card and the antenna.
Securing the batteries
On CanSat NeXT, the board is designed such that a zip tie can be attached around the board to ensure the batteries are held in place in vibration. Otherwise, they have a tendency to pop out of the sockets. Another worry about batteries is that some batteries are shorter than would be ideal for the battery holder, and it is possible than in a particularly high shock, the battery contacts will bend under the weight of the batteries such that a contact is lost. To mitigate this, the contacts can be supported by adding a piece of zip tie, foam or other filler behind the spring contacts. In accidental (and intentional) drop tests, this has improved reliability, although CanSat NeXTs integrated into well built CanSats have survived drops from up to 1000 meters (without a parachute) even without these protection measures. An even better way to support the batteries is to design a support structure directly to the CanSat frame, such that it carries the weight of the batteries on impact instead of the battery holder.
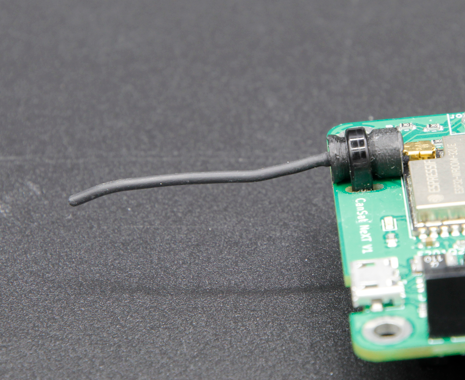
Securing the antenna cable
The antenna connector is U.Fl, which is an automotive rated connector type. They handle vibration and shock quite well despite not having external mechanical supports. However, the reliability can be improved by securing the antenna with small zip ties. The CanSat NeXT board has small slots next to the antenna for this purpose. To keep the antenna in a neutral position, a support can be printed for it.
Securing the SD card
The SD card can pop out of the holder in high shocks. Again, the boards have survived drops and flights, but reliability can be improved by taping or glueing the SD card to the holder. Newer CanSat NeXT boards (≥1.02) are equipped with high-security SD card holders to mitigate this issue further.
Communications test
One of the most vital details to get right for a successful mission is to have a reliable radio link. There is more information about selecting and/or building the antennas at the hardware section of the documentation. However, regardless of the selected antenna, testing is a vital part of any radio system.
Proper antenna testing can be tricky and requires specialized equipment such as VNAs, but we can do a functional test directly with the CanSat NeXT kit.
First, program the satellite to send data, for example a data reading once a second. Then, program the ground station to receive data, and to print RSSI (Received signal strength indicator) values, as given by the getRSSI() function, which is part of the CanSat NeXT library.
#include "CanSatNeXT.h"

void setup() {
  Serial.begin(115200);
  GroundStationInit(28);
}

void loop() {}

void onDataReceived(String data)
{
  int rssi = getRSSI();
  Serial.print("RSSI: ");
  Serial.println(rssi);
}
This value represents the actual electrical power received by the ground station through its antenna when it receives a message. The value is expressed in decibelmilliwatts. A typical reading with a working antenna on both ends when the devices are on a same table is -30 dBm (1000 nanowatts), and it should drop fast when the distance increases. In free space, it follows roughly the inverse square law, but not exactly due to echoes, fresnel zones at other imperfections. With the radio settings that CanSat NeXT uses by default, the RSSI can be taken down to roughly -100 dBm (0.1 picowatt) and still some data gets through.
This corresponds usually to a distance of roughly a kilometer when using the monopole antennas, but can be much more if the ground station antenna has significant gain, which directly adds to the dBm reading.
Power tests
It's a good idea to measure the current draw of your satellite using a multimeter. It's easy too, just remove one of the batteries, and hold it manually such that you can use the multimeter current measurement to connect between one end of the battery and the battery contact. This reading should be in the order of 130-200 mA if the CanSat NeXT radio is active and there are no external devices. The current draw rises as the batteries are discharged, as the more current is needed to keep the voltage at 3.3 volts from the lowering battery voltage.
Typical AAA batteries have capacity of around 1200 mAh, which means that the holding current draw of the device should be less than 300 mA to ensure the batteries will last the whole mission. This is also why it is a good idea to have multiple operating modes if there are current-hungry devices on board, as they can be switched on just before the flight to ensure good battery life.
While mathematical approach to estimating the battery life is a good start, it is still best to do actual measurement of the battery life by getting fresh batteries and doing a simulated mission.
Aerospace testing
In the aerospace industry, every satellite undergoes rigorous testing to ensure it can survive the harsh conditions of launch, space, and sometimes reentry. While CanSats operate in a slightly different environment, you could still adapt some of these tests to improve reliability. Below are some common aerospace tests used for CubeSats and small satellites, along with ideas for how you could implement similar testing for your CanSat.
Vibration testing
Vibration test is used in small satellite systems for two reasons. The primary reason is that the test aims to identify resonating frequencies of the structure to ensure the vibration of the rocket doesn't start resonating in any structure of the satellite, which might lead to a failure in the satellite systems. The secondary reason is also relevant to CanSat systems, which is to confirm the quality of the craftmanship and ensure the system will survive the rocket launch. Satellite vibration testing is done with specialized vibration test benches, but the effect can be simulated with more creative solutions too. Try to come up with a way to really shake the satellite (or preferrably its spare), and see if something breaks. How could it be improved?
Shock test
A cousin of vibration tests, shock tests simulate the explosive stage separation during the rocket launch. The shock acceleration can be up to 100 Gs, which can easily break systems. This could be simulated with a drop test, but consider how to do it safely so that the satellite, you, or the floor doesn't break.
Thermal testing
Thermal testing includes exposing the entire satellite to the extremes of the planned operating range and also moving rapidly between these temperatures. In CanSat context, this could mean testing the satellite in a freezer, simulating a launch on a cold day, or in an mildly heated oven to simulate a hot launch day. Be careful that the electronics, plastics, or your skin is not exposed directly to extreme temperatures.
General good ideas
Here are some additional tips to help ensure a successful mission. These range from technical preparations to organizational practices that will improve the overall reliability of your CanSat. Feel free to suggest new ideas to add here through the usual channel (samuli@kitsat.fi).
- Consider having a checklist to avoid forgetting something just before the launch
- Test the entire flight sequence beforehand in a simulated flight
- Test the satellite also in similar environmental conditions as is expected on the flight. Ensure the parachute is also OK with the expected temperatures.
- Have spare batteries, and think about how they are installed if needed
- Have a spare SD card, they do fail sometimes
- Have a spare computer, and disable updates on the computer before the launch.
- Have spare zip ties, screws and what ever else you need to assemble the satellite
- Have some basic tools on hand to aid in disassembly and assembly
- Have extra antennas
- You can also have multiple ground stations operating at the same time, which can also be used to triangulate the satellite, especially if there is RSSI available.
- Have clear roles for each team member during the launch, operations, and recovery.
This is the end of the lessons for now. On the next page is a flight-readiness review, which is a practice aiding in ensuring successful missions.